I fell into a rabbit hole. It all started with quarantine, and too many Zoom calls.

That's me on Zoom, attempting to do what everyone else was doing these days: messing around with their webcam. Trying to have some fun during those remote calls that filled your entire calendar now that you've gone full remote.
I could think of three reasons for Zoom's virtual background feature not working for me:
- My webcam isn't that good. Too much noise in the input;
- My background is awful, filled with visual noise, and with a color that's probably too close to my own skin;
- Linux. We're often the underdogs when it comes to support from proprietary software.
A sensible person would move on with his life. Or maybe buy a better webcam.
A sensible person would not go:
Oh, I used to study computer graphics! This looks like a fun side-project
Me, first days of quarantine
This felt like a good excuse to play around with Rust, but most of all, to finally learn how to use FFmpeg.
FFmpeg
This is an open source library for multimedia processing. It's likely you stumbled upon it at some point, particularly if you googled something like "how to convert video format".
ffmpeg itself is a command line tool that provides an entire toolkit to
process video/audio streams. A few examples:
# resize a video to 1280x720
$ ffmpeg -i input.mkv -vf scale=1280x720 output.mkv

# convert between two container formats
# (ffmpeg can guess the formats by the file extensions)
$ ffmpeg -i input.mp4 output.mkv

# record 10 seconds from a webcam feed
$ ffmpeg -f v4l2 -framerate 25 -video_size 640x480 \
  -i /dev/video0 -t 00:00:10 output.mkv
Under the hood, FFmpeg include libAV, which is the API that allows you to do all of this stuff, and much more, programatically.
So my overall idea was:
- Create a fake webcam on my system (something like
/dev/video1instead of/dev/video0, which points to my real one); - Use FFmpeg to read the input from my webcam;
- That output would go through a magic video processing box that I'll somehow build;
- Use the resulting video as the feed from my fake webcam;
- Learn something along the way.
Spoiler alert: The video processing yielded some results, just not as good as I had hoped for.
Faking a webcam
As it turns out, this is a fairly easy thing to do, in Linux at least. The way devices are registered in the system is friendly towards these kinds of hacks.
Video devices in Linux are commonly handled by a set of drivers called V4L2
(remember the -f v4l2 flag in the example above?).
And someone had already published a kernel module that can be used to create virtual devices compatible with V4L2: v4l2loopback
With this module, creating a fake webcam is as easy as:
$ sudo modprobe v4l2loopback devices=1 \
  video_nr=2 card_label="Fake" exclusive_caps=1
My system actually has two default video devices. So video_nr=2 is because
I actually need to create /dev/video2 instead. Which is what happened:
$ v4l2-ctl --list-devices
Fake (platform:v4l2loopback-000):
        /dev/video2

UVC Camera (046d:0825) (usb-0000:2a:00.3-1.4):
        /dev/video0
        /dev/video1
Feeding the fake device
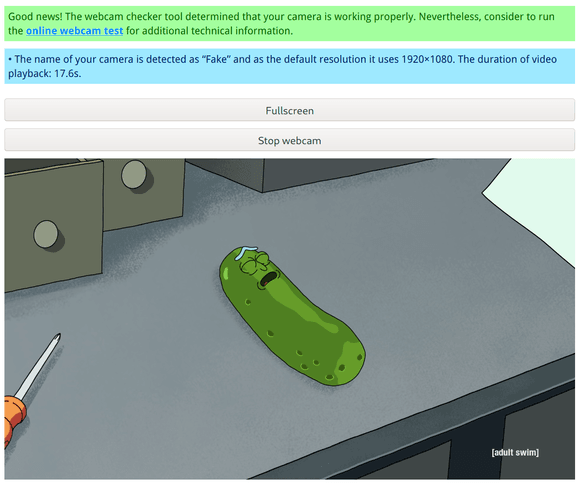
Once you have that device running, you may notice it doesn't show up in your browser. That's because there's no actual video feed coming from it. What would your browser show?
So let's debug that quickly with ffmpeg, just to make sure we can get this
layer to work. We can prototype things with the CLI tool before commiting to
implementing a whole program using libav.
ffmpeg \
  -re \ # read video in the real framerate
  -i pickle-rick.mkv \ # input file
  -vcodec rawvideo \ # webcams expect raw video
  -pix_fmt yuv420p \ # the same format used by my real one
  -framerate 25 \
  -f v4l2 /dev/video2
And my browser is now able to consume /dev/video2 correctly.

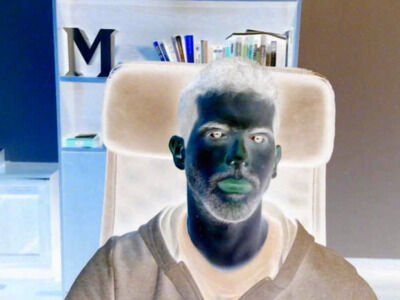
I can even do a test with my actual webcam, and include a simple filter, such as inverting colors, which makes me look like some sort of white walker.
ffmpeg \
  -f v4l2 -framerate 25 -video_size 640x480 \
  -input_format mjpeg \
  -i /dev/video0 \
  -vcodec rawvideo -pix_fmt yuv420p \
  -vf negate \ # simple filter to negate all color channels
  -f v4l2 /dev/video2


Ok, this was fun. Let's now port this over to actual code...
The Code
Part of the challenge on the Rust side of things is the fact that libAV is a C API, and an outdated one at that. Much of the goodness we're used to with modern languages isn't available. Things such as error handling and debugging become closer to a black art than I'd prefer.
The existing FFI wrappers for ffmpeg (such as the one I'm using) do a decent job at providing a more Rust-like interface, but due to weak typing of some of the functions, it can only go so far:
use std::ffi::{CString};
use ffmpeg4_ffi::sys::{AVFormatContext, av_guess_format};
use std::ptr::{null, null_mut};

let mut context: *mut AVFormatContext = null_mut();

let format = unsafe {
  av_guess_format(
    CString::new("v4l2").unwrap(),
    null(),
    null()
  )
}
This is what most calls to libAV look like. Strings need to be converted to
their C representation (null-terminated arrays of characters). Pointers need to
be allocated separately and passed around as mutable arguments. And yes, pretty
much everything is unsafe, since we're dealing with raw pointers.
With all that in mind, I won't bore you with all the details of the code for this layer. But it's all isolated (and somewhat readable) in the two modules where I abstracted this behaviour to:
-
DecoderCtx: Connects to a video source, and provides an interface to read video frames from it. The analog to the-f v4l2 -framerate 25 -video_size 640x480 -i /dev/video0part of the CLI commands; -
EncoderCtx: The opposite end of the pipeline, where processed frames are encoded again and written to an output video feed (-vcoded rawvideo -pix_fmt yuv420p -f v4l2 /dev/video2);
With that in mind, we can write a more high-level program that pipes the input feed to the output:
use ffmpeg4_ffi::sys;

let mut decoder = DecoderCtx::new(&settings)
let mut encoder = EncoderCtx::new(&settings, &decoder)

# allocate two frames
let input: *mut sys::AVFrame = unsafe { sys::av_frame_alloc() };
let output: *mut sys::AVFrame = unsafe { sys::av_frame_alloc() };

loop {
  decoder.decode_frame(&input);

  do_stuff(&input, &output);

  encoder.encode_frame(&output);
}
Now within do_stuff we can do whatever we want with the given image. We just
need to ensure the output image is encoded in the correct format (the one
expected by our encoder, yuv420p in my case) and resolution.
This also can, and probably should, be parallelized in some way.
Ideally, frames should be read at a constant rate, equal to the desired
framerate, and processed asynchronously. The processing done by do_stuff and
the encoding itself take considerable time. If the image is large enough, or if
do_stuff is actually doing a lot of stuff, its easy for the framerate of your
output to drop as a consequence. For this purpose
though, we're not getting into that (perhaps a later post).
Now on to editing the image.
OpenCV
This one gives me a few bad memories from back when I was a student, but its still one of the obvious candidates when it comes to image processing libraries.
Now that we have a frame isolated, there's still one step left before being able to process them with OpenCV.
Pixel format conversion
Raw frames come in YUV format which store luma (how bright a pixel
is) in the Y channel and chroma (what color it is) in U and V channels.
OpenCV needs images to be in BGR format, with 3 color channels.
For that, we also need to use libswscale which is part of the FFmpeg package,
and handles conversions between pixel format conversions:
# we need 4 frames now
let input_yuv = sys::av_frame_alloc();
let input_bgr = sys::av_frame_alloc();
let output_bgr = sys::av_frame_alloc();
let output_yuv = sys::av_frame_alloc();

let BGR: = sys::AVPixelFormat_AV_PIX_FMT_BGR24;
let YUV: = sys::AVPixelFormat_AV_PIX_FMT_YUVJ420P;

# sws
let yuv2bgr_context = sys::alloc_sws(width, height, YUV, BGR)
let bgr2yuv_context = sys::alloc_sws(width, height, YUV, BGR)

loop {
  decoder.decode_frame(&input_yuv);

  # convert input frame to RGB
  sys::sws_convert(yuv2bgr_context, input_yuv, input_bgr)

  do_stuff(&input_bgr, &output_rgb_frame);

  # convert processed RGB frame back into YUV
  sys::sws_convert(bgr2yuv_context, output_rgb, output_yuv)

  encoder.encode_frame(&output_yuv);
}
Blurring
As a simple example, let's say we want our do_stuff function to blur the input
image. With all the encoding & conversion work out of the way, that is now
a simple task:
use opencv::imgproc;
use opencv::core::{BorderTypes, Point, Size};

fn do_stuff(*mut sys::AVFrame input, *mut sys::AVFrame output) {
    let src = cast_frame_to_mat(input);
    let mut dst = cast_frame_to_mat(output);

    imgproc::blur(
        &src,
        &mut dst,
        Size::new(64, 64),
        Point::new(-1, -1),
        BorderTypes::BORDER_CONSTANT as i32,
    )
    .unwrap();

    self.out
}
Notice we need use frame_to_mat to convert FFmpeg frames to OpenCV's structs.
The underlying data buffers aren't touched, so this isn't an expensive
operation. The implementation is available here for those
interested in the details.
Since OpenCV already provides functions for standard operations, we just need to
call imgproc::blur to tie it all together2:

Multiple filters
The final version is a bit more complex than the code shown above, because it allows piping multiple filters in a pipeline, by simply configuring a JSON file:
  "input": "/dev/video0",
  "output": "/dev/video2",
  "width": 1280,
  "height": 720,
  "fps": 30,
  "pipeline": [
    {
      "name": "blur",
      "k": 64
    },
    {
      "name": "sepia"
    }
  ]
Conclusion
This is only the groundwork for more useful features. Being able to decouple filters allows us to mount them together like Legos. One filter can run a background subtraction algorithm, and a subsequent filter can apply an effect to the remaining empty space.
However, it seems the limitations I mentioned at the beginning also prevented me from having a useful result in some cases, most notably the background subtraction part.
A future step will be to try this out with different conditions (better webcam, or cleaner background wall), and evolve from there.
For now, you can check all the existing code, and run it yourself (provided you're on Linux) on the open-source repo.

